EV Charging Operating Guide
This Operating Guide is appropriate for all electricity providers. Any instructions that differ for a specific electricty provider will be highlighted.
The following outlines how to configure Energy Manager's EV Charging module to charge your electric vehicle.
Prerequisites
The following are prerequisites that need to be met before EV charging will be able to be used in your Energy Manager system:
1) You will need to install the HACS integration for OCPP (OCPP stands for Open Charger Port Protocol). The installation instructions are located on the EV Charging dashboard within Energy Manager.
2) Your EV charger must be fully OCPP 1.6j compliant. Most fast chargers are OCPP compliant, but no slow 10A "granny" chargers will be. This module will not work with slow granny chargers. You will need a dedicated fast charger that will be installed on its own circuit. If you received a charger that plugs into a typical wall socket when you purchased the EV, this will not be sufficient. The module is for AC fast charging only.
If you are going to purchase a fast charger to charge your EV, make sure it is OCPP 1.6j compliant and importantly allows a user-configurable OCPP endpoint.
A good example of a compliant charger is the Ocular IQ Home Solar.
It is extremely important to make sure that the OCPP function on the charger allows control by a third party (in this case, Home Assistant). n example of a so-called "OCPP compliant" charger that does not allow remote control is the Evnex charger. Chargers like this will not** work with Home Assistant. Ensure you do your research before purchasing a fast charger to ensure it is not a closed systems like the forementioned charger.
Some chargers, like the Myenergi Zappi support OCPP but are cloud-based. If you want to use a Zappi with remote OCPP support, you will need to port-forward the Myenergi sourced traffic through to your Home Assistant. As at the time of writing the Zappi has not been tested.
You will need to make sure your EV Charger is configured in such a way that it is not trying to make competing decisions with Energy Manager. Fast EV chargers generally offer some basic solar charging, but this can interfere with the optimisation that Energy Manager performs.
An example configuration for the Ocular IQ Home Solar can be found here.
Charger Integration
| Type of charger | Ease of Integration | Examples |
|---|---|---|
| Local OCPP | ☑️ Easiest | Ocular IQ Home Solar, Delta AC MAX, Circontrol eNext Elite / eHome, some Rolec, Sungrow iHomeManager with charger (when in Standalone Mode, to be confirmed). Possibly the Sigenstor with EV charger module (to be confirmed) |
| Cloud OCPP | ✔️ Moderate difficulty | Myenergi Zappi, Wallbox Pulsar Plus (potentially cloud controlled) |
| Non-controllable/vendor locked OCPP | ❌ Not compatible | Evnex, Sungrow iHomeManager with charger (when in Ecosystem Mode) |
| Non-OCPP | ❌ Not compatible | Tesla Wall Connector |
Installation of the OCCP integration
The EV Charging module is included in the premium subscription and uses the HACS OCPP integration as an interface.
From within Energy Manager, browse to the EV dashboard
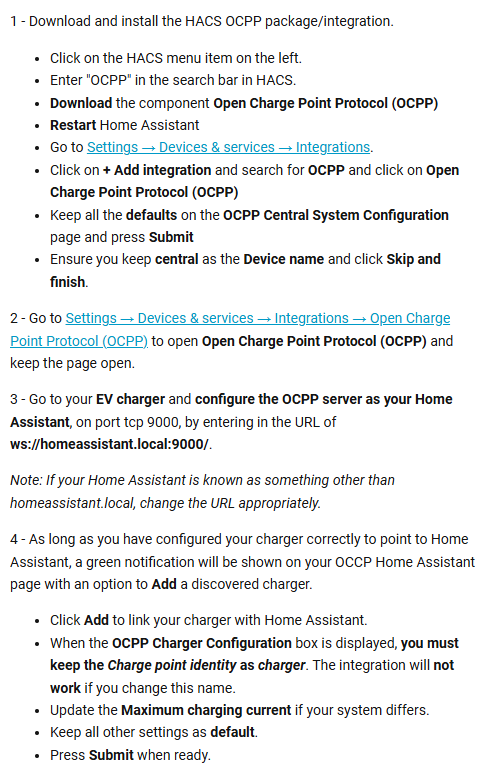
Once in the EV dashboard, the following instructions are provided to take you through the installation procedure for the HAC OCPP integration:
Once you have completed performing this work and the integration has been detected by Home Assistant, the instructions will be replaced with some additional settings and a summary of your EV charger that has been added:
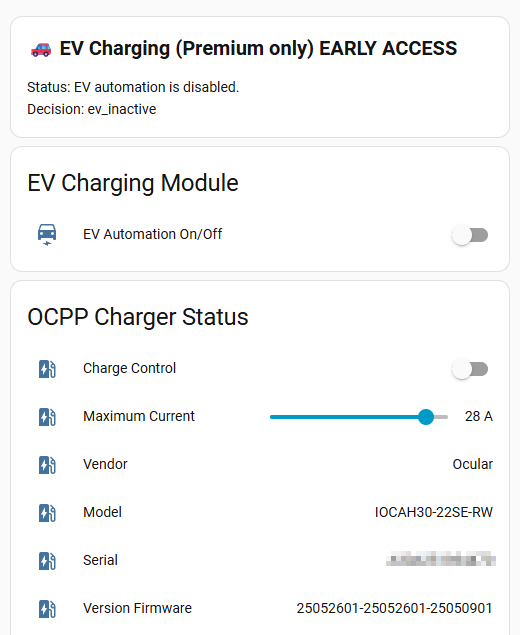
In the OCPP Charger Status section you will see a long list of settings and readings from your EV charger. Some of these may read as unavailable or unknown. If this is the case, it will generally be because your charger is not responding to those queries due to them not being supported. This is not a fault, rather it is most likely a limitation of your charger and generally shouldn't be of any concern.
Charging Modes
The EV charging dashboard contains various sections, but two important ones are the modes.
Two modes are available:
1) Scheduled Charging
2) Ready-by Charging
These modes a mutually exclusive in that only one mode can be enabled at a time. If you enable one mode, the other is automatically disabled.
Scheduled Charging mode
Scheduled charging mode allows you set a time window when charging is allowed to occur.
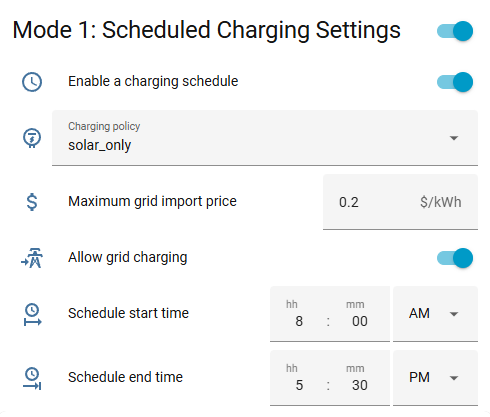
Along with the time, you can also select the maximum price you are willing to purchase electricity from the grid at. By disabling grid charging you are limiting charging to solar only. Note that Flow Power users configure an upper price signal limit, not a monetary value.
There is also a Charging policy select box, which is explained in an upcoming section below.
Note that the Scheduled Charging mode does not aim to reach the end time with the energy amount you have specified completed - that is what the Ready-by mode is for. Scheduled charging will aim to charge optimally during the specified period. If the period concludes and the required kWh has not been put into the battery, it will continue when the charging schedule opens again. The scheduled charging mode is designed for opportunistic charging - it will charge when suitable.
Ready-by Charging mode
Ready-by charging mode allows to you define a deadline by when you want your vehicle charged by. Energy Manager will work out the cheapest periods for charging, aiming to have your vehicle ready by the configured deadline.
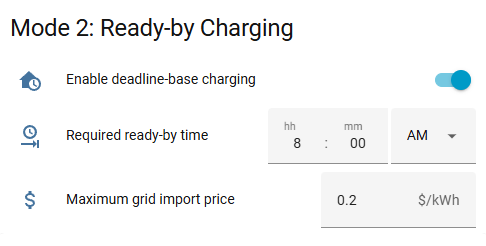
There are two main settings (outside of general settings, see later) for Ready-by mode. Firstly, the deadline to have the vehicle charged by, and secondly, the maximum price you are willing to pay to charge your vehicle from the grid. Note that Flow Power users configure an upper price signal limit, not a monetary value.
Charging Policies
Scheduled Charging mode contains three policies that will change the behaviour of your charging:
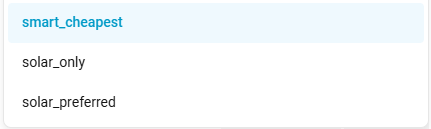
Smart cheapest
Energy Manager will look to charge whenever it can in the schedule as long as the buy price is at or under your selected maximim price (or price signal for Flow Power users). If the forecast is indicating that it can easily charge within the scheduled window (up to the selected kWh), it will charge at the cheapest periods, even if there are other more expensive periods that are still within your price limit. Note that you must enable Allow gird charging to use the smart_cheapest policy.
Solar only
Should you only want to charge with solar excess, select solar_only as your charging policy. As long as there is excess solar (i.e., it would normally be exported to the grid), and the excess energy is 8A (~1900W single-phase, ~5700W 3-phase) or higher, charging will occur.
Notes:
- An 8A minimum excess solar (per phase) is required before solar_only charging will start. This is a required safety for your car battery. Your EV will consume power to charge the vehicle, for example, your BMS (battery management system). For this reason, you need a certain amount of power available to start (and maintain) a charge. If this is not suitable for you, consider using the solar_preferred policy instead.
- Charging from solar_only means charging from excess. If your home battery is not yet fully charged, your home battery system will direct your charging to your home battery. Once your home battery is charged, any excess will be routed to the grid - which is when this solar_only policy will come into play.
- Ensure that Allow charging from solar excess and Allow disable of curtailment in the Solar Charging section are both enabled if you are going to use the solar_only policy.
- Ensure that the Surplus/Start threshold and Lower threshold settings in the Solar Charging section are appropriately set if you are going to be use the solar_only policy. See later for details on how to configure this.
Solar Preferred
The solar_preferred policy is beneficial for those with less excess solar that can't reach the minimum 8A all the time. The mode will charge using excess, but if the minimum 8A cannot be reached by solar alone, it will top up the 8A by pulling from the grid, but only at or below your selected maximum import price (or price signal).
Notes:
- Charging from solar means charging from excess. If your home battery is not yet fully charged, your home battery system will direct your charging to your home battery. Once your home battery is charged, any excess will be routed to the grid.
- Ensure that Allow charging from solar excess and Allow disable of curtailment in the Solar Charging section are both enabled if you are going to use the solar_only policy.
- Ensure that the Surplus/Start threshold and Lower threshold settings in the Solar Charging section are appropriately set if you are going to be use the solar_only policy. See later for details on how to configure this.
- If you never have 8A of excess solar, this policy will charge at 8A (using both your excess solar and the grid to top up to 8A). If you need to charge faster than 8A and you don't have over 8A of excess solar, you should choose the smart_cheapest policy, as this will use your excess solar plus charge at up to your maximum circuit limit (usually 32A). Note that if you have excess solar of 10A, that this policy will top out at 10A because it will no longer take from the grid to top up, as you would already be charging at 8A so grid support would not be needed. You are limited to your maximum solar excess to achieve high charge rates.
Battery only
The battery_only policy will allow your battery to be used to supply the EV. Note that if you use this policy during the day when there is excess solar, your excess solar will also be used to charge the EV. Consider this mode as a "set my charger going but since the battery is in self-consumption mode it will take from the battery".
Notes:
- Ensure that you set your Min home battery SOC (under Battery Protection) appropriately. If you charge when your battery reserve has been met, you will pull from the grid.
- Ensure that the Allow home battery to charge EV (under Battery Protection) has been enabled, to allow your battery to be used.
- This is not a recommended charging method as there are greater inefficiencies using this method, however it is included for those that can't charge during the day and want to use their stored energy.
Settings configuration
Solar Charging
If you want to charge from using solar, you will need to configure the Solar Charging section.
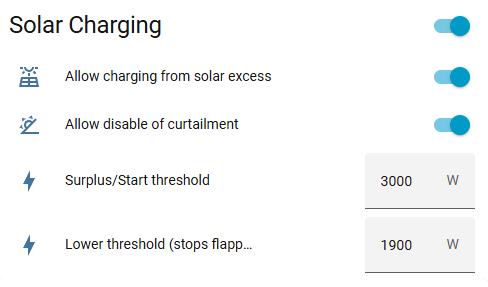
- Enable Allow charging from solar excess to allow your excess solar to be used.
- Enable Allow disable of curtailment to remove the curtailment that Energy Manager will set when sell prices become negative. Without removing the curtailment setting, the excess solar cannot be realised since it is not known (it is curtailed).
- The Surplus/Start threshold must be set over the 8A minimum charging requirement. Ideally add at least 1000W over the lower threshold so that if your solar generation lowers, it will not keep stopping and starting (flapping). The principle is that if charging can occur from 1900W (single-phase), start it only higher so that generation dips lower, it will not keep turning of charging - so it is only starting when there is consistently more solar generation.
- The Lower threshold (stops flapping) setting should be set at roughly the 8A minimum (1900W single-phase, 5700W 3-phase). If the solar_only policy is selected, charging will stop under this value.
Battery Protection
If your home battery system and EV charging can interact together, it may be possible for you to transfer your home battery storage into your EV battery. The Battery Protection settings allow you to control whether you want to charge your EV from your home battery or not, and how much of the energy to transfer.
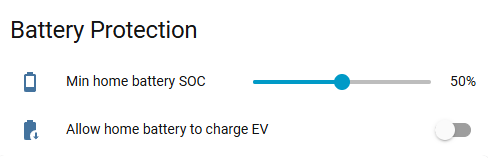
- The Min home battery SOC is the reserve that you can set on your home battery so that EV charging can use the home battery, but only to a specified battery level. After the level is met, the discharge rate from your battery will be decreased to stop drain. Note that this will also mean that your house load will come from the grid since your battery has been throttled.
- Enable the Allow home battery to charge EV if you would like to use your home battery for EV charging. Generally this is not advised, but you can use it if you wish.
General settings
All charging modes and policies will use the General Settings detailed here.
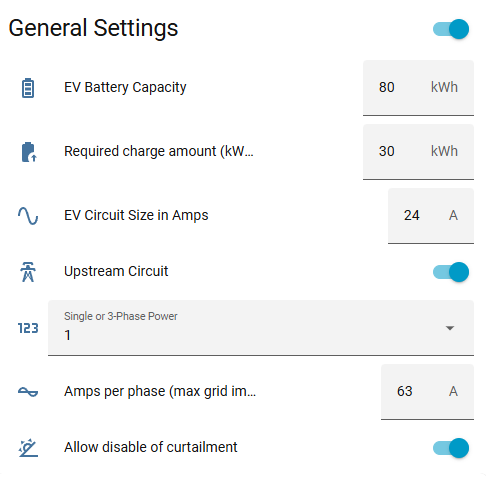
- EV Battery Capacity - this is the size in kWh of your EV battery.
- Battery Charging Measurement - by default this is kWh (since OCPP does not support battery SOC), but you can also select Percentage if you have a compatible integration installed for your EV that can read your EV battery SOC (save the entity name in the /share/ev_battery_soc_sensor.txt file within Home Assistant, for example, sensor.7x_zeekr_battery_level - this will depend on your integration and vehicle). If you do not have a compatible integration installed, you must keep this as kWh.
- Required charge amount (kWh) - this is the amount of energy that you wish to cap your charging at. Once this is reached, charging will stop. Note that due to the OCPP charging protocol, the EV battery SOC is not able to be read with AC chargers like they can on DC fast chargers, so instead it needs to work on the amount of energy that you want put into the EV. Example - If I want to charge a 100kWh battery by 20%, I would enter 20kWh here.
- Charge to (available only if Percentage has been selected) - this is the percentage to charge your vehicle to, e.g., 80%.
- EV Circuit Size in Amps - enter the size of your EV circuit. Generally it will be a 32A circuit, but you should enter it slightly lower here so that you don't trip your system if the EV demands slightly higher on startup.
- Upstream Circuit - Enable this only if your solar and battery system cannot see your EV Charger. This will attempt to work out EV Charger usage while calculating excess solar, etc, without direct access to any sensors obtained from your solar and battery system. This will not be applicable to most installations.
- Single or 3-Phase Power - enter the number of power phases to your premises.
- Amps per phase (max grid import) - enter the number of amps that your premises can draw from the grid. This is not the EV circuit size, but your complete system. Typically this is 63A per phase, but confirm with your electrician before setting. Some properties may allow 80A. Some three-phase properties may only allow 32A per phase (so a total of 96A). Note that the figure to input here is the per-phase amps.
- Allow disable of curtailment - this is a repeat of the setting in the Solar Charging section. Toggling here will also toggle elsewhere.
Take a read of the EV decision reference guide if you are wanting to understand what the decisions mean that come back from the Energy Manager servers.