Energy Manager Settings
These instructions are specifically for Other/DIY customers, not for Amber Electric, LocalVolts, Flow Power or GloBird customers ("Other" is defined as retailers like AGL and CovaU). Please refer to the Amber Electric & LocalVolts settings for Amber Electric & LocalVolts customers, Flow Power settings for Flow Power customers, or GloBird settings for GloBird customers.
Energy Manager Settings Page
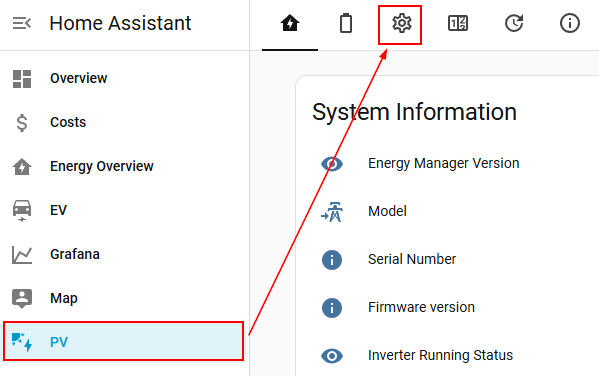
Select the PV menu on the left menu. Then click on the COG icon on the top tab.
Tariff Configuration
For most electricity providers, the Other option can be used. This allows you to configure your own plans, as provided by your electricity provider (e.g., AGL, CovaU, etc)
The Other electricity provider allows you to define your own Peak, Shoulder, Offpeak, and Export periods and tariffs, and allows you to define when Energy Manager should import to charge your battery (if at all), export to the grid (during happy hours), etc. You can manually define your own plans, or you may be able to find it already configured as a plan that you can import that someone else has already defined.
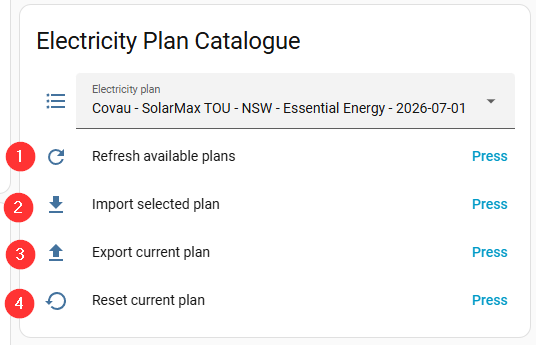
- As long as your Electricity Distributor (DNSP) has been configured below (see later), you can click on Refresh available plans to pull a list of available plans from the repository.
- Once you found an appropriate plan, you can select Import selected plan to load all the tariff period information.
- If you decide to create your own plan from a provider not listed already and want to share it with others, press the Export current plan button and locate the exported json in /config/www/energy-manager/tariffs/export. You can then either share it in the discord server, or create a pull request at https://github.com/ha-energymanager/energy-manager-tariffs with your submission.
- If you have made changes to your plan and you want to start again, press the Reset current plan button and try again.
A series of plan tariff options can be found below the Electricity Plan Catelogue:
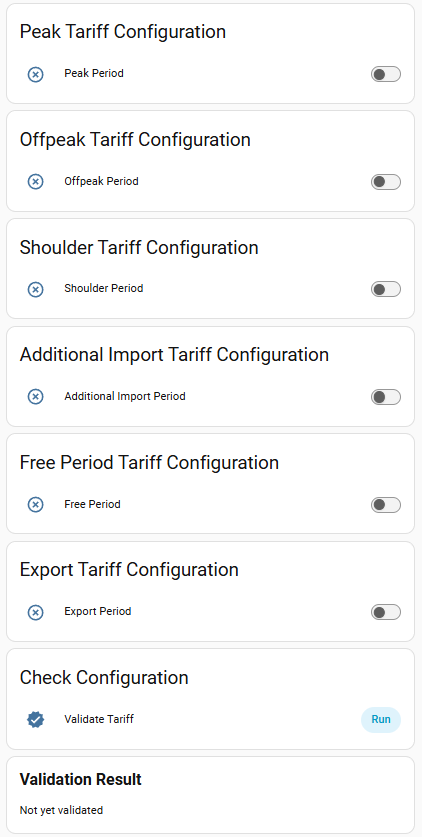
Each of these plan options are optional, but you do need to have a full 24hrs defined for both import and export periods, even if priced at zero cents.
Peak Periods
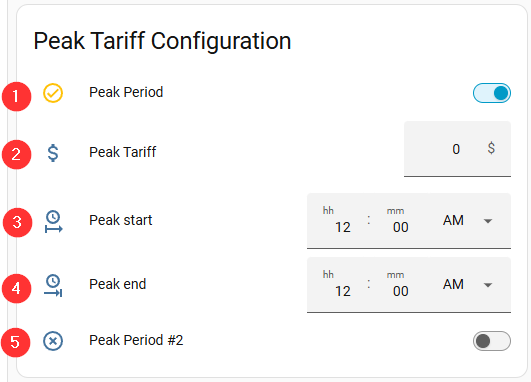
- By enabling Peak Period you can define your first peak period. Up to three peak periods can be defined.
- Enter in your Peak Tariff in dollars, so 45c would be defined as 0.45
- Enter the Peak start for this particular tariff
- Enter the Peak end for this particular tariff
- Enable Peak Period #2 if you have a second peak tariff period (also available is Peak Period #3, if required.
Offpeak Periods
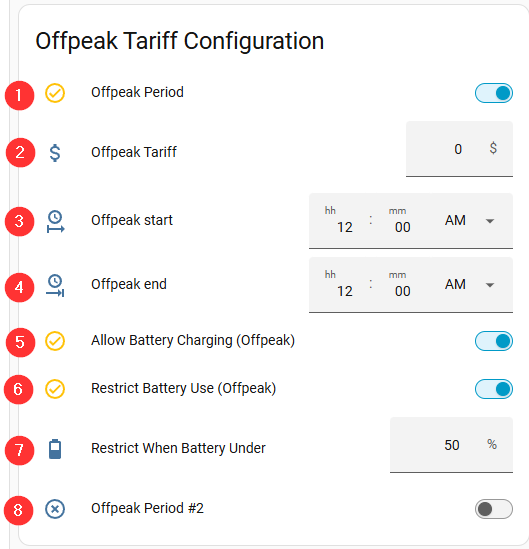
- By enabling Offpeak Period you can define your first offpeak period. Up to three offpeak periods can be defined.
- Enter in your Offpeak Tariff in dollars, so 45c would be defined as 0.45
- Enter the Offpeak start for this particular tariff
- Enter the Offpeak end for this particular tariff
- Select whether you want to Allow battery charging or not during this offpeak period. Allowing battery charging does not mean that it will charge, but it gives Energy Manager permission to charge during this period if there is both not enough solar and not enough other cheaper periods to get your battery charged fully for the day. If Energy Manager can charge your battery cheaper (either other tariffs or from solar alone), then it will not use this tariff for charging.
- Decide whether you want to Restrict battery use during this offpeak period. If the buy price is sufficiently cheap during this period, then it may be beneficial to save your battery for during more expensive peak periods instead of using your stored energy if, for example, the sun goes behind a cloud and you can no longer stay self-sufficient. Each discharge of your battery will cause wear & tear, so often it is more beneficial to take cheap power from the grid. Note that when this option is enabled that the following Restrict when battery under option will appear.
- If you have enabled Restrict battery use above, you are able to specify when to restrict its use. For example, you may want to only restrict the use of the battery when under 50% SoC. If you always want to restrict its use, make this figure 100% (i.e., do not use the battery if the battery is under 100% full).
- You can define up to two more offpeak periods
Shoulder Periods
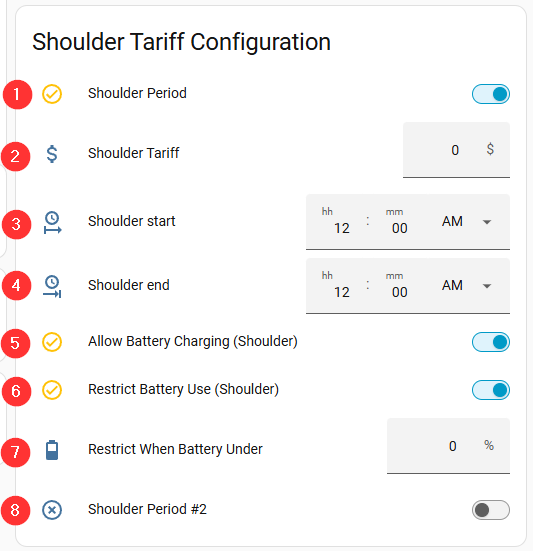
The Shoulder settings are similar to Offpeak
- By enabling Shoulder Period you can define your first shoulder period. Up to three shoulder periods can be defined.
- Enter in your Shoulder Tariff in dollars, so 25c would be defined as 0.25
- Enter the Shoulder start for this particular tariff
- Enter the Shoulder end for this particular tariff
- Select whether you want to Allow battery charging or not during this shoulder period. Allowing battery charging does not mean that it will charge, but it gives Energy Manager permission to charge during this period if there is both not enough solar and not enough other cheaper periods to get your battery charged fully for the day. If Energy Manager can charge your battery cheaper (either other tariffs or from solar alone), then it will not use this tariff for charging.
- Decide whether you want to Restrict battery use during this shoulder period. If the buy price is sufficiently cheap during this period, then it may be beneficial to save your battery for during more expensive peak periods instead of using your stored energy if, for example, the sun goes behind a cloud and you can no longer stay self-sufficient. Each discharge of your battery will cause wear & tear, so often it is more beneficial to take cheap power from the grid. Note that when this option is enabled that the following Restrict when battery under option will appear.
- If you have enabled Restrict battery use above, you are able to specify when to restrict its use. For example, you may want to only restrict the use of the battery when under 50% SoC. If you always want to restrict its use, make this figure 100% (i.e., do not use the battery if the battery is under 100% full).
- You can define up to two more shoulder periods
Additional Import Period
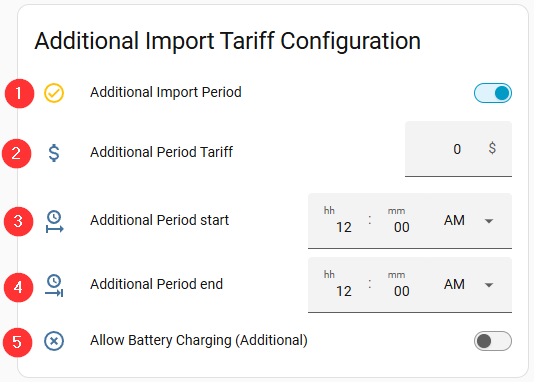
Usually Peak, Shoulder, and Offpeak import tariffs are appropriate for most electricity plans. However, should your electricity provider have another type of tariff, you can define it in the Additional Import Tariff Configuration section.
- By enabling Additional Import Period you can define a custom period.
- Enter in your Additional Period Tariff in dollars, so 35c would be defined as 0.35
- Enter the Additional Period start for this particular tariff
- Enter the Additional Period end for this particular tariff
- Select whether you want to Allow battery charging or not during this additional period. Allowing battery charging does not mean that it will charge, but it gives Energy Manager permission to charge during this period if there is both not enough solar and not enough other cheaper periods to get your battery charged fully for the day. If Energy Manager can charge your battery cheaper (either other tariffs or from solar alone), then it will not use this tariff for charging.
Free Period
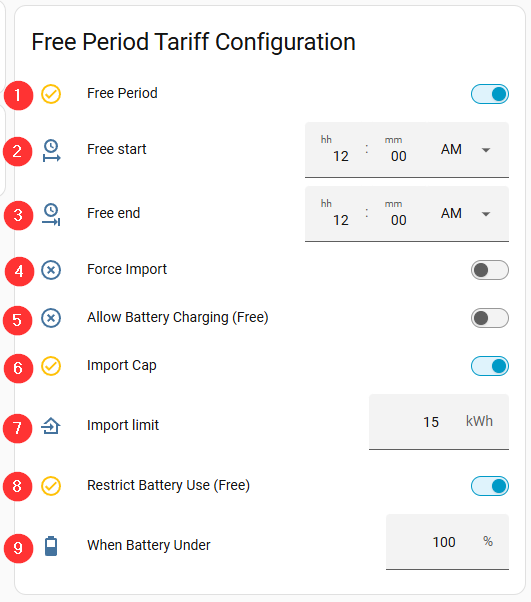
- By enabling Free Period you can define your a free period.
- Enter the Free start for this particular tariff
- Enter the Free end for this particular tariff
- Enable Force Import if you want to force grid import during this period, whether it is required or not.
- Enable Allow battery charging if you want to allow your battery to be charged during this period. You should keep this enabled to use the free period to its advantage.
- If your provider restricts the amount of energy that can be imported during the free period, enable the Import Cap option. This will display the Import limit of the next point below.
- If you have enabled an Import Cap, enter the Import limit in kWh that your provider allows for free. After this import has been reached, forced import will no longer occur.
- On a free period it is generally best to Restrict battery use, since electricity is free. This is enabled by default - this will stop your battery being used when under a specific battery SoC (refer next point).
- If Restrict battery use has been enabled, you can then set When battery under to only restrict the battery when a specific SoC. For the free period you should keep this on 100% as it is better to always restrict the battery and draw from the grid instead.
Export/Feed-in Periods
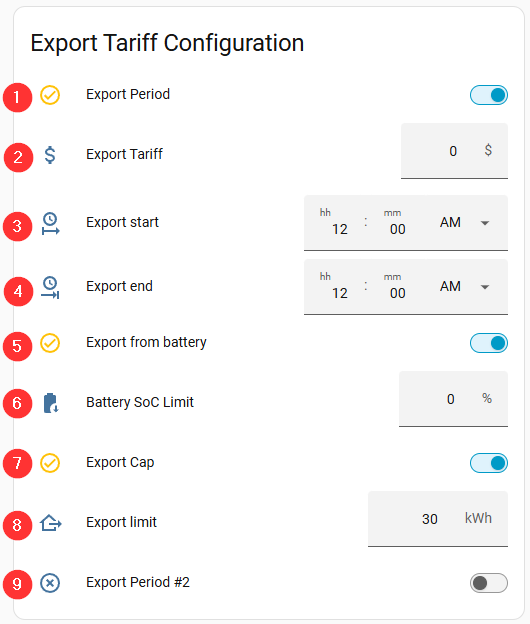
- By enabling Export Period you can define your an export period. Up to three export periods can be defined.
- Enter in your Export Period Tariff in dollars, so 15c would be defined as 0.15
- Enter the Export start for this particular tariff
- Enter the Export end for this particular tariff
- Select whether you would like to Export from your battery during this period. Enabling this will force your battery to discharge during the period. Disabling it will not allow a forced discharge from your battery, but excess solar will still overflow to the grid.
- If you are going to export from your battery during this period, set a Battery SoC Limit that you are willing to export down to. For example, entering 60% would mean that your battery will be discharged down to 60% SoC.
- If you have an Export Cap, configure it here. By enabled Export Cap, the Export Limit option will be displayed.
- Enter your Export limit if you have enabled Export Cap. When the amount of energy export reaches this figure, exports will stop. Note that this figure is independent of any other export caps from other export period that you may later configure.
Note that export will stop at the first of Battery SoC Limit and Export limit (cap). So if you allow 10kWh energy to be exported on a 40kWh battery (so 25% of the energy), and you have a 50% SoC limit, then it will stop after the 10kWh has been exported, not when the battery reached 50% SoC.
Validate your tariff settings
Once you have entered in your tariff details, it is vital to validate that all time periods are accounted for.
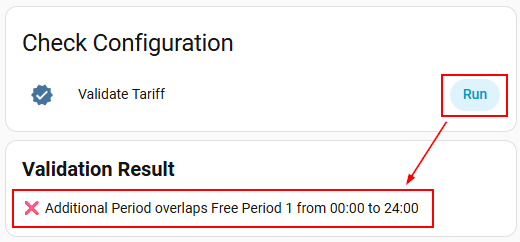
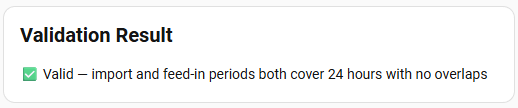
- Press the Validate Tariff run box. The results will be shown in the Validation Result box. If any errors exist, like shown here, go and fix them and return and validate once again. Keep going until the message is shown as below:
You can go directly to the other sections of this configuration page below: